
Hey everybody it's Jake Turpin with Minimal Audio! For today's blog, we're celebrating the launch of our latest Sample Pack: Polarity – A darker more atmospheric collection, fusing the enigmatic styles of dark Garage with upbeat 2-step grooves and sub-heavy basses.
It's a pretty inspiring pack, so inspiring that after I was sent Polarity - I immediately made a beat with it, which is kind of the best compliment you can give in these situations!
While I was exploring the sounds in Polarity, it reminded me of when I first started producing. That anxious/excited feeling of downloading entire collections of samples from some sketchy corner of the internet, holding your breath that you haven't accidentally primed your downloads folder for some brutal new form of malware you've yet encountered. Finally installing the pack and watching it appear inside your DAW. Opening a MIDI track and...nothing.
You see, I had gone to all this trouble to download the hardest 808 in existence only to realize – I had no idea what to do with it! I knew what sounds I wanted, but I didn't know how to make the patterns, let alone shape the sample to fit inside a track.
Fast forward to today, and I've had a different kind of realization. The realization that many young producers are in the same boat I was all those years ago.
You can download the most vibey sample pack in existence but at the end of the day, you don't know what you don't know.
That's why I decided to make this quick easy tutorial on making UK Garage, one of my favorite genres of music in existence! Together we'll go over finding things like groove and feel, while also taking a look at editing existing samples to fit seamlessly together in a track. So without further adieu let's jump right in with...
Breakdown
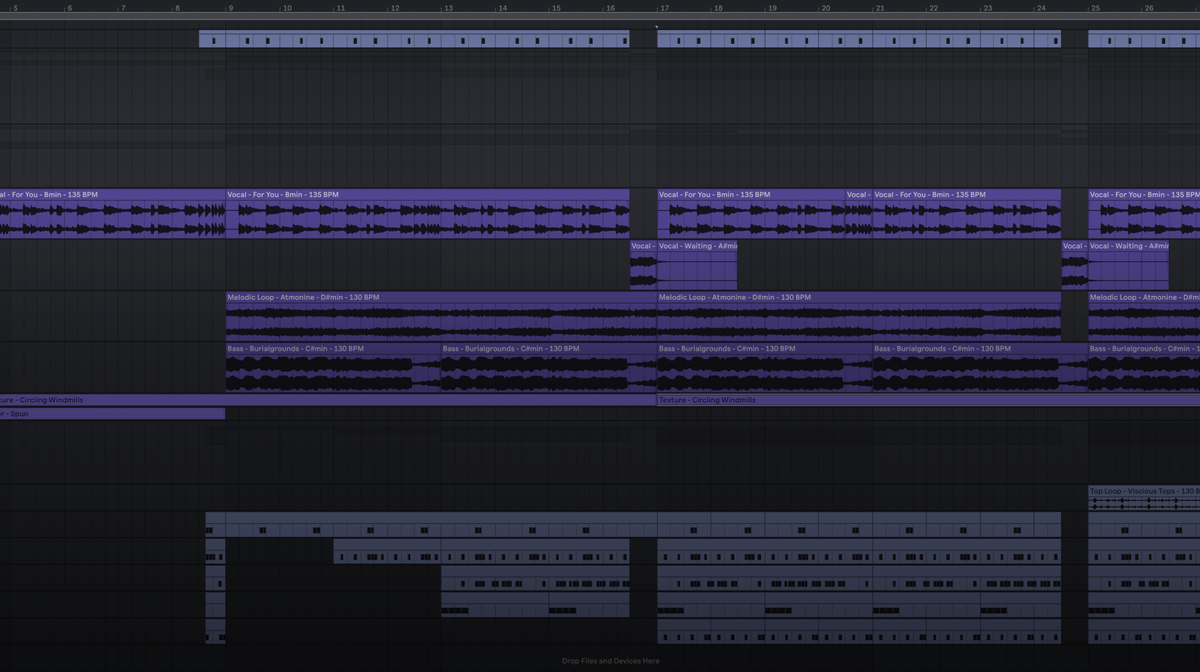
First, lets's listen to the full beat to give you some context for each part of the piece. Together, we'll go over constructing the drums and the melodic sections of the track, and how it all comes together.
Before we get too in the weeds, let's get some housekeeping out of the way. This beat is in D-Minor and it's BPM is 130. This beat was made in Ableton, but everything we'll talk about here applies to every DAW. Now let's make some drums!
The Drums
The Drums are the most important part of any dance track. They establish the groove of the song (which in dance music is often the genre as well) while dictating the form and the pace of the entire composition.
When selecting drum samples you want to pay attention to a couple of things – First how the drums sound by themselves. And then second, how the samples sound together as a collection. It's always important to ask yourself, do these samples sound like they could exist together in the same room? If the answer is yes then you're already on the right track!
If you're having trouble figuring out if your drum kit is sounding related, think about it like this. Sounds in a song should respond to each other – if you have a brighter knockier kick then select a darker less noisy snare. Choose one sample and then let the sample you chose decide the next one. This helps to make sure your kit is well-balanced and dynamic!
The Kick

Let's talk about the kick! The kick in any piece of music is important, but in dance music especially – the kick is king. In a UK Garage track the kick outlines the pulse of the song while creating the rhythmic pocket that the listener dances to. The kick creates a landing feeling for your audience. While the other drums and instruments help guide the dancer through your composition, think of the kick as your punctuation points. They're the emphasis in the drum pattern that keeps the beat moving.
For this pattern, I chose the Kick - Chunkitize sample, and dropped it into Ableton's simpler. I chose this sound because I wanted a drum that felt beefy without feeling too bassy, and also has a good amount of high-end to it which will contrast well with the kind of sub-bass that UK Garage is famous for.
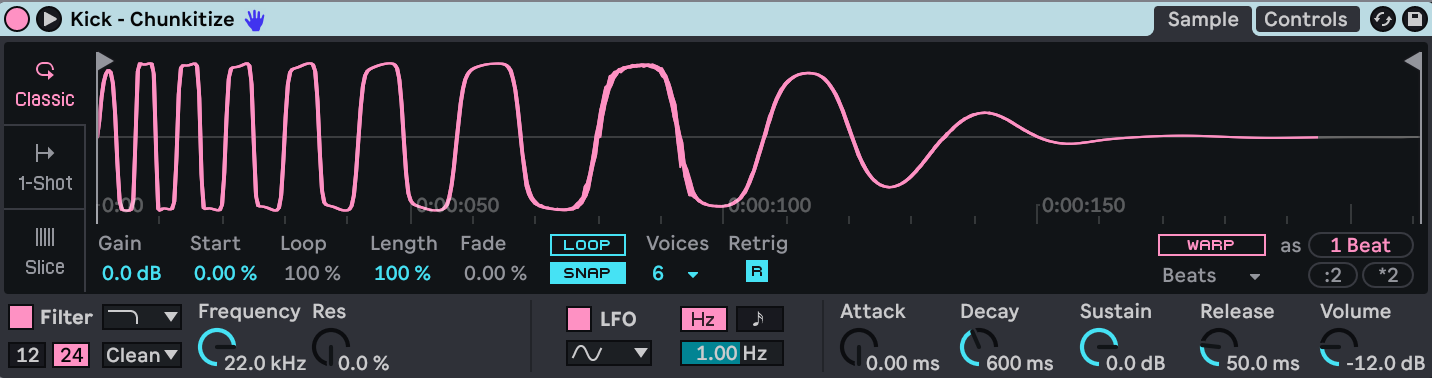
Notice how the pattern of the part is based on small rhythmic motifs that repeat at the beginning of each phrase. Every bar of the pattern starts the same way. This creates an expectation that exists in the listener's mind. This expectation is very powerful because it allows you to play with it (whether that rhythmic motif will be there or not) to create the formic structure of the song. In most kinds of dance music when the kick is in it gives the feeling of release to your audience. When you remove the kick tension is created. This interplay between creating and releasing tension is the foundation that most music is built on and is explicitly outlined with the kick in this beat.
The Snares


While the kick is easily the most important piece to your drum kit for UK Garage, a close second is the snare. Snares are used as smaller less important punctuational points in your tracks – if the kick is a period, think of the snare as a comma. Something that helps define your beat, but doesn't dictate it.
In this track we're using two snares the samples are Snare - Ear Candy, and Snare - Outsider. I chose these two because I felt that complimented each other tonally without being so similar that you could still identify both when played next to each other.
Now, you may be wondering...Why two snares? This is an effect that can be created through a lot of different methods, but for this tutorial, we're taking a page from House music. In House, producers often use a clap sitting rigidly at 2/4, with the snare accenting the off beats around those strong beats. We're achieving the same effect here, but instead of a snare and a clap, we're using two snares. Ear Candy outlines the strong beats of 2-And (2.5 on the MIDI roll), and 4. While Outsider is accenting those softer beats around it. Creating a rhythm that compliments the kick while remaining fun and distinct within the drum pattern.
Percs


Finally, to close out the drum section let's talk about Percussion. The percussion in any dance track tells the listener where they are formally in the song. They add energy to the composition while outlining the beat already created by the kick and snare. Adding and taking away percussion from your beat is a great way to tell the listener – This is THE part to dance to.
For our percussion, I used four tonally distinct high hats mixed in with the top loop Vicious at the end to drive energy. What's important to note here is that the hats all cover the same parts of the pulse in different ways. This creates a steady pulse for the listener to grow attached to, but with a lot of interplay between sounds so the pattern never becomes boring in its repetition.
Listen back to the video above and note how every time a hat is added the same rhythmic ground is covered yet the energy increases. This is because the hats are all in service of filling the pulse of the beat while remaining tonally distinct enough that their own groove is created.
Melodics
Next, let's move on to the melodics. This will be a catchall term we're using for all of our pads, leads, and bass samples. Since these are full loops found in the pack. I want to focus on tweaking these loops to work together rather than the composition of each part.
Vocal Chops
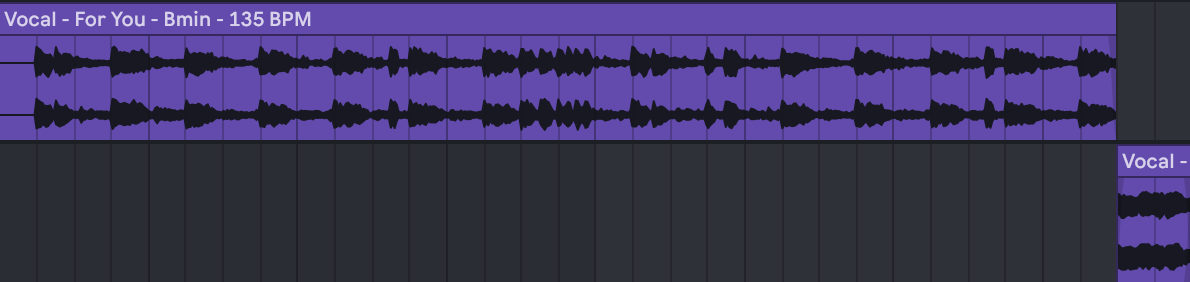
The vocal lead in this beat comes from two separate sample loops found in Polarity – For You - B Minor, and Waiting – in A# Minor. Both are beautiful on their own but when combined they have a magical call-and-response-like quality. It keeps the melody of the track flowing without being so complicated that it takes attention away from the drums or the bass.
As I've been introducing the vocal samples you may have noticed something. Each of these samples is in two different keys, and at the beginning of our tutorial, I mentioned that the key of this piece is in D Minor. So how do these two seemingly disparate loops work together? It's simple we just repitch them!

In Ableton, there are a plethora of repitching features that make reharmonizing your samples to each other a breeze. If you're new to repitching think of each step as a note (If you have a piano keyboard it can help to follow along). If we're in B and we pitch one step up then you'll notice we're in C. Two steps from B and we're in C#, and three steps from B we're in D. D is our target key, so we pitch our sample three steps up.
This technique will be applied to the rest of our loops to pitch each one into the key of D Minor. Note that this technique doesn't work for every kind of sample but for our purposes, it'll work like a charm.
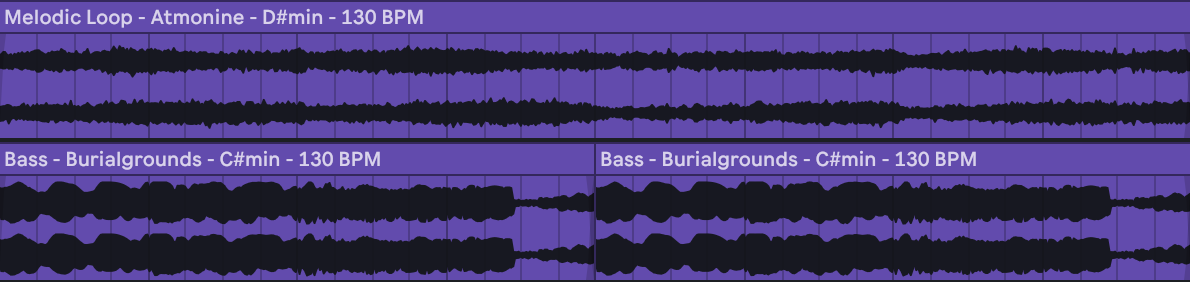
We'll repeat the same process for our bass and pad samples – making sure that each sample is in key and grooving with the rest of the track. When they all play together they should sound harmonious to one another. If you're following along and noticing something sounding off. Go back and check on each sample to make sure they're pitched correctly. It can be a lot to keep up with, so attention to detail here is important.
Full Beat
Once you've gotten your drums and your melodics working together you should come away with something like this! Notice I've added an atmospheric loop called Texture - Circling Windmills from the pack to tie all the sounds together.
Textures in UK Garage are used to create beds for the rest of the track to lie on. It ties the disparate sounds together and creates that final piece of atmosphere that elevates a beat from a loop into a composition!
Now that you have your full beat together it's time to have some fun with it! Try adding and subtracting elements. Try showcasing elements in different combinations this beat is your playground to do whatever you'd like with it.
Thanks for tuning in! Come back next time for more tutorials and music history.
Check out our latest sample pack: Polarity Here, and until next time – Keep Creating!